Sunday, September 25, 2011

Sewing for Newbies: Novelty Cottons

Novelty cottons are 100% cotton fabrics in "novelty" prints. Though they are often classified as quilting fabrics, most are suitable for apparel.  They are a great choice for beginners because they are inexpensive and easy to sew - they cut cleanly, don’t unravel too quickly, don’t slide around, and hold a crisp crease when pressed.  They’re not as dressy and elegant as velvets and satins, of course, but they are more practical in hot weather.

Note: Always wash and dry cottons before cutting and sewing.

While relatively gothy prints such as skulls or damask can be found year-round, autumn brings a bounty of spookiness in the form of Halloween prints.  Some prints are obviously Halloween (candy corn, pumpkins), but many feature icons of goth that can be worn any time (skeletons, bats, spiderwebs, black cats).

Here are some skirts I made in Halloween cottons:
made with McCalls 5811
made with New Look 6944
And some "anytime" skirts: 
made with McCalls 5681
made with Simplicity 2449

I get tons of compliments on these skirts, especially around Halloween.  If you stitch up something similar for yourself, you might be bombarded with compliments and questions of "Where did you get that?".  You can proudly reply, "I made it myself."  :D

Wednesday, September 21, 2011

Painted IKEA Wardrobe, Part 2

The painted wardrobe project is finished!  As I mentioned in Part 1, I used a primer for plastic in the hope that it would help the paint stick to the melamine surface.  It seems successful so far.

(April 2013 update: I have now used the wardrobe in two different rooms, and the paint job withstood all the moving around with no chips or scratches.)

In addition to hiding the television, I wanted the wardrobe to hold my speakers, modem, router, CDs and DVDs.  Holes drilled into the back made it easy to run the various wires and cables.
 

The wardrobe came with only one shelf.  Rather than try to make additional shelves to fit, I simply placed a small bookcase inside.  Placing the TV on top of the bookcase put it at perfect viewing height.  (Look at my adorable dog peeking out from under her blanket!)


Before attaching the doors, I stenciled them.  I highly recommend using repositionable stencil adhesive, especially with a complicated stencil.  It keeps the stencil still while you're applying the paint, giving a much more precise result.  You don't need to buy special stencil paint; regular latex paint will work if used properly.  The key is to roll off any excess paint from your roller before you begin stenciling.  A heavily loaded roller will cause paint to seep underneath the stencil.  Use light pressure and roll in several directions to cover the area completely.

With doors attached, the wardrobe is complete!


It's painted and stenciled to match my desk.


The desk was an awesome find -- free on craigslist!  It was battered but very sturdy solid wood.  Sanding, painting and stenciling gave it a completely new look.


Leftover wallpaper makes great drawer liner.

The wardrobe and the desk are next to each other in my living room.  It looks much tidier with all the entertainment paraphernalia hidden.

Tuesday, September 20, 2011

Hello, Grey

The exterior paint job is finished!  I chose a neutral medium grey trimmed in white.  I considered more interesting color schemes, but let's face it -- the house is a flat, plain little box, and any attempt at elegance would just be silly. :)

Nonetheless, even a plain ranch house can benefit from a few aesthetic upgrades.  I replaced the ancient entry door.  I also had the absurd chimney pipe cut down and boxed in.  Painted grey, it's a lot less conspicuous.  I'll also add new light fixtures and new house numbers.  I haven't decided what color to paint the entry door.  What do you think?


And the rear view.  When I bought the house, the only way to get to the backyard was to go out through the garage.  That got annoying fast.  I had the dining room window changed to a door (sliding glass would be the first thought, but using a regular door and sidelight meant I could keep the same 48" framing from the window, greatly reducing the need to cut into the exterior walls).  The temporary steps look silly, but they'll do for now.  I also had the dog door hole repaired as best it could be.

The next major task is an overhaul of the utterly pathetic front yard.  Unfortunately, it will have to wait a while.  In the meantime, its barren state will be perfect for a Halloween graveyard! ;-)

Sunday, September 18, 2011

Farewell, Turquoise

My house is turquoise.  Now, I think turquoise is a pretty color, but not what I want for the outside of my house.  The solution, of course, is to paint the exterior.  However, I am afraid of heights and I don't like being in the sun, so I reluctantly decided to hire someone.  I kept reminding myself that for some tasks, even the most hardcore DIYer is better off hiring a pro.  For the last two days, I have waited nervously behind plastic-covered doors as two guys spray, roll, and brush away the turquoise.  Though I'm glad it's them on the ladder, I really hate having so little control over the quality of the work being done.

This is what the house looked like when I bought it.  The house is that little turquoise thing behind the HUGE tree.

Later, the tree broke under a heavy snowfall and was removed, revealing the other half of the house and matching turquoise chimney pipe.


This is the back of the house.  Yep, that's a dog door cut into the wall by the previous homeowner.

I anxiously await the "after"...

Monday, September 12, 2011

Wall Decals Are Not Just for Walls

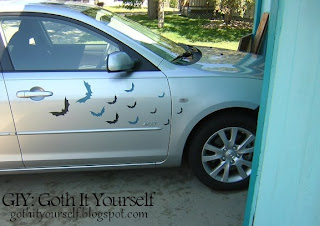
Last October, I found purple and black bat decals. Purple! Bats! :-D I bought them and stuck them to... my car. My coworkers thought it was a cute Halloween decoration. Pfft!  Bats aren't just for Halloween! I did not remove the bats on November 1.  In fact, I didn't remove them at all.  They've been on my car almost a year, staying firmly in place, even surviving multiple trips through the car wash. Just in the last month or so, the purple has faded to blue.  Not bad considering the decals are supposed to be used inside, not subjected to the intense Solarado sun. I'm now on the lookout for new bat decals.


Sunday, September 11, 2011

Painted IKEA Wardrobe, Part 1

As I wrote in an earlier post, I recently bought an IKEA wardrobe, which I want to paint to match my desk.  The wardrobe has a melamine finish, to which latex paint does not stick.  The last time I tried to paint a piece of melamine furniture, it was an utter disaster. I think (hope) I'm smarter this time...

I decided to prime the sides and front before I assembled the wardrobe.  First, I applied two coats of a spray primer for plastic.  I'm hoping it will be the key to making the paint stick to melamine!  I used a clear Valspar spray because that's all Lowe's had.  I did not like it because it was very difficult to tell where I had sprayed or how well it was covering.  After it dried, I applied two coats of Rust-Oleum Painter's Touch spray primer in grey.

(Update: Rust-Oleum primer is now labeled "also bonds to plastic," and my experience shows that to be correct. I no longer bother with a plastic primer.)

After the grey primer dried, I brought the pieces inside for assembly.  If you've never put together IKEA furniture, the number and variety of screws, pegs and fasteners can be daunting.

But I find the instructions -- no words, just funny-looking little people -- are very clear and the pieces go together easily.  If you're assembling a piece of cube-shaped furniture (armoire, bookshelf, chest of drawers, etc.) by yourself, propping the sides against a chair makes putting on the top and bottom much easier.

I assembled the wardrobe, except for attaching the doors.  I painted the sides and front black (Behr latex paint in "Beluga") and the doors grey ("Pewter Mug").  So far, the paint seems to be adhering well.  (Fingers crossed!)  After the paint is thoroughly dry, I'll add stenciling.

Wednesday, September 7, 2011

Stripey, Batty Chest of Drawers

It's a sad fact that I have no artistic ability.  Zero.  I can barely draw stick figures.  Once, I tried taking a beginner's drawing class.  After working with me for a few minutes, the instructor said, "It's like you have some kind of learning disability for drawing."  Gee, thanks.

Despite my "disability," I love to rescue old furniture and give it new life with paint.  With craft stores full of stencils and so forth, one does not need to be a Monet to create a fun piece of furniture.  I'm sure the artists on etsy would scoff at me, but I am happy with the results (and that's all that matters). 

I found this little chest of drawers in a thrift store.  It was real wood and absolutely the perfect size for the corner of my bedroom. 

(Sorry for the lack of step-by-step photos.  This project was done pre-blog.)

First, I sanded it a little to smooth out the nicks and dings, then applied a coat of latex primer.  Primer helps the paint stick; this is especially important if you have not stripped the furniture down to the bare wood.

Then I painted the drawer fronts and the sides of the chest black and the front and top of the chest white.  I used Behr interior latex paint, the same stuff I use on my walls. 

After the paint was thoroughly dry, I masked off stripes using 1" painters tape.  To make crisp stripes, I highly recommend spending a couple extra dollars for FrogTape instead of regular blue painters tape.  The paint seeps underneath FrogTape much less, especially if you're careful to rub the edges down well.  I then painted white over the unmasked areas.  It might seem counter-intuitive to paint white over black, but with latex paints, lighter colors cover better.


To dress up the drawer fronts, I decided to add bats behind the existing wood knobs.  Craft stores sell a variety of little wood shapes for less than $1 each.  Around Halloween, you can get shapes suitable for gothy decor -- bats, skulls, cats, coffins.  I always stock up on bats.  ;-) 

I painted the wood bats and knobs purple, then drilled a hole in each bat for the screw to go through.  To finish, I gave all the painted surfaces a couple coats of polyurethane.


The formerly ugly brown chest now proudly sports three of my favorite things: black and white stripes, bats, and purple.  :D

Sunday, September 4, 2011

The Theme Park that is IKEA

IKEA is loved by many.  There is a website, IKEA Hackers, dedicated to projects made from modified IKEA items.  Though I generally prefer to buy second-hand solid wood furniture, some items, such as wardrobes, are difficult to find.  With big closets in most American houses, freestanding wardrobes are rarely needed and thus scarce in US-based stores.  For the wardrobe/armoire I wanted for my living room, IKEA was the best source.  

Also, my house has almost no hardwired lighting.  Lamps that stand on the floor or sit on a table are easy to find; lamps that attach to the wall or hang from the ceiling... not so much.  They are scarce (and pricey) online and nonexistent locally.  Having been to IKEA stores, I know they are THE place to find those types of lamps.

One small problem -- the closest IKEA was Salt Lake City, 550 miles away.  But luckily for me and the other 2.5 million residents of the metro Denver area, IKEA announced it was opening a store in the Mile High City.  With much fanfare, that store opened about six weeks ago.

I was planning to postpone my visit until January, by which time the epic crowds would hopefully be reduced.  But I experienced a bout of temporary insanity and decided to brave IKEA today.

What was I thinking!? ;)  The place was like a theme park!  Event staff guided the line of cars into the parking lot; shoppers queued up to take the escalator.  And then it was a huge mass of people slowly following the arrows on the floor as they stared in wonder, mouths agape.  Clearly, most of them had never seen anything like IKEA before.  I found it hard not to laugh out loud.  I dodged around the mesmerized people, picked out some lamps, loaded up a wardrobe, and was at the checkout in 45 minutes (receiving three "where did you get those awesome boots?" compliments on my New Rocks in the process -- FashioNation should give a discount for all the referrals!).  More event staff guided us into the elevators, an IKEA staff guy helped me load my car, and I was back on the highway, headed home!  Success!

Naturally, I have no intention of just putting together the armoire and placing it in my living room as-is.  Oh, no... it needs some GIY first. :)

Thursday, September 1, 2011

September Theme Post: Boots


The September one-day theme on Sophistique Noir is boots.  I love boots, and if this were a fashion blog, my post would practically write itself.  But this is GIY!  How does footwear relate to a GIY project?  Let me show you...

First, I'll introduce you to my first pair of New Rocks, purchased in 2001.  Behold the bat-bedecked splendor!

Second, meet my basement.  When I purchased my house, it came complete with a partially "finished" basement -- cheap brown paneling, gold shag carpet, and oddly placed, poorly constructed homemade walls.

Last spring, the 70's called and wanted their basement back.  I seized the opportunity to try my hand (or foot) at demolition and quickly found that tearing stuff down was very therapeutic.  I had no idea how much fun it would be to put my New Rock-clad foot through a wall.  :-)   

The wall before...

... and after the repeated application of New Rocks.